Automating Visual Studio Templates
I find Visual Studio Item Templates very useful, but a lot of teams I encounter haven’t really adopted them as they can be a pain to construct. Here’s the technique I use to manage the templates and make it painless to add new ones and modify existing templates if they need to change. What we do is put the templates into source control and then use a build process to automate the production and distribution of the zip files.
There are two types of templates, project and item and they are accessed via directories configured under the Visual Studio options dialog
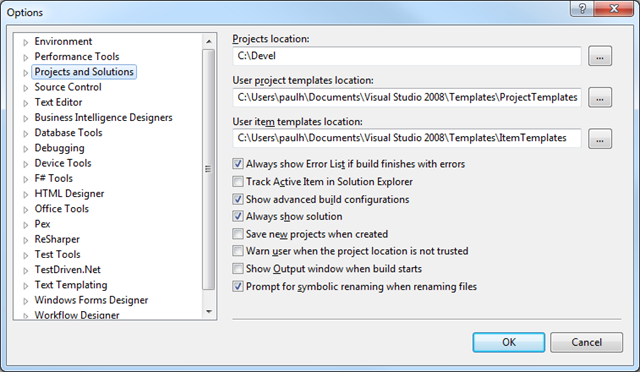
When working in a team, it is a good idea to map these two directories to a central location – that way as new templates are developed or improved the entire team benefits at once.
A template is a actually just a zip file containing one or more files plus a template file in XML that tell Visual Studio what to do – and that’s part of the problem. The directory structure in the zip must reflect exactly the structure where you want to put the files in the project and the templates themselves must be structured into a directory hierarchy to get the sections support in Visual Studio, for example see the screen shot of my MVP presentation tier templates.

So, first of all create a root directory for all your templates, and then create two main subdirectories; items and projects. In each create subdirectories to classify your templates, e.g. Core, Data, Web, etc. In the appropriate directory you then need a directory per template, see below
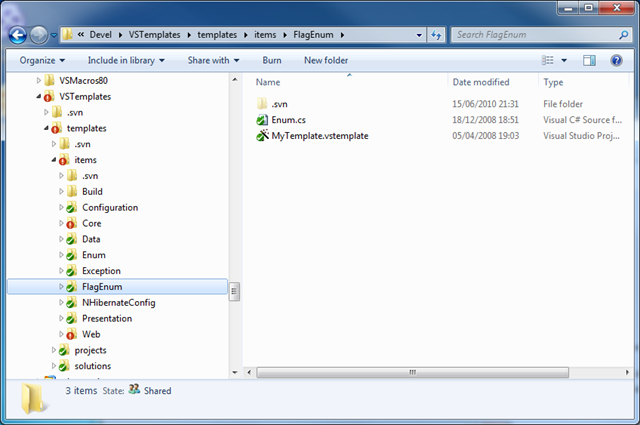
This is a simple template I have for creating a flag enum, i.e. an enum that is a bit field – the source is shown below.
namespace $rootnamespace$
{
    using System;

    /// <summary>
    ///
    /// </summary>
    [Flags]
    public enum $filename$
    {
        // Suggest using hex rather than decimals as below to avoid overlapping/missing values
        A = 0x1,
        B = 0x2,
        C = 0x4,
        D = 0x8,
        E = 0x10,
        F = Ox20
    }
}
There are two macro replace values in the file, rootnamespace, which is replaced by the namespace of the directory you create the file in, and filename which is replaced by the value you enter in the Add Item dialog. We also have to produce the accompanying template file which must be called MyTemplate.vstemplate
<VSTemplate Version="2.0.0" xmlns="http://schemas.microsoft.com/developer/vstemplate/2005" Type="Item">
  <TemplateData>
    <DefaultName>Flags.cs</DefaultName>
    <Name>Flag Enum</Name>
    <Description>Enum that is meant to be a set of flags</Description>
    <ProjectType>CSharp</ProjectType>
    <SortOrder>10</SortOrder>
    <Icon Package="{FAE04EC1-301F-11d3-BF4B-00C04F79EFBC}" ID="4515" />
  </TemplateData>
  <TemplateContent>
    <References />
    <ProjectItem SubType="Code" TargetFileName="$fileinputname$.cs" ReplaceParameters="true">Enum.cs</ProjectItem>
  </TemplateContent>
</VSTemplate>
Now next we need the MSBuild Community Tasks assembly and an MSBuild project file, items.proj
<Project DefaultTargets="Build" xmlns="http://schemas.microsoft.com/developer/msbuild/2003" >
	<!-- Basic properties -->
	<PropertyGroup>
		<ToolsPath Condition="'$(ToolsPath)' == ''">C:\Program Files</ToolsPath>
	</PropertyGroup>

	<!-- Import a bunch of external targets -->
	<Import Project="$(MSBuildExtensionsPath)\MSBuildCommunityTasks\MSBuild.Community.Tasks.Targets"/>

	<!-- The templates we want to produce -->
	<ItemGroup>
		...
		<ItemTemplate Include="FlagEnum" />
		...
		<ItemTemplate Include="ViewBundle">
			<Category>Web\</Category>
		</ItemTemplate>
		...
	</ItemGroup>

	<!-- Ok, standard action is to create clean zip files -->
	<Target Name="Build" DependsOnTargets="Clean;Zip;" />

	<Target Name="Clean">
		<!-- Need this for the first time through when Build doesn't exist -->
		<MakeDir Directories="Build" Condition="!Exists('Build')" />
		<!-- Can't delete it if it has contents, so delete them first -->
		<Delete Include="Build\**\*.*" Condition="!Exists('Build')" />
		<RemoveDir Directories="Build" />
		<MakeDir Directories="Build" Condition="!Exists('Build')" />
	</Target>

	<Target Name="Zip" Outputs="%(ItemTemplate.Identity)" >
		<MakeDir Directories="Build\%(ItemTemplate.Category)" Condition="%(ItemTemplate.Category) != ''" />
		<CreateItem Include="$(MSBuildProjectDirectory)\%(ItemTemplate.Category)%(ItemTemplate.Identity)\**\*.*"
			Exclude="$(MSBuildProjectDirectory)\%(ItemTemplate.Category)%(ItemTemplate.Identity)\**\_svn\**\*.*;$(MSBuildProjectDirectory)\%(ItemTemplate.Category)%(ItemTemplate.Identity)\**\.svn\**\*.*">
			<Output TaskParameter="Include" ItemName="ZipFiles" />
		</CreateItem>
		<Zip Files="@(ZipFiles)"
			ZipFileName="$(MSBuildProjectDirectory)\Build\%(ItemTemplate.Category)%(ItemTemplate.Identity).zip"
			WorkingDirectory="$(MSBuildProjectDirectory)\%(ItemTemplate.Category)%(ItemTemplate.Identity)" />
	</Target>
</Project>
I suggest keeping the template files in alphabetic order in the target list irrespective of directory, it’s much easier to work out if you have missed one out that way.
Now if you set up a project in your favourite continuous integration server, whenever any developer creates or improves a template, the build process produces all the zip files and then can copy them to the shared directory.